How to Create a ProConnect Bootable USB System Recovery Drive (Windows)
A bootable USB system recovery drive is useful to troubleshoot or restore operation of a ProConnect NVR. A bootable USB System Recovery created through a Windows computer offers the ability to do a
- Upgrade: Settings and video data will not be affected.
- Clean OS install: All settings will be lost. Video data will not be affected.
- Factory Reset: All settings and video data will be lost
Note: USB recovery will require a dedicated USB flash drive with at least 4GB space. The instructions below will only work when creating a bootable USB drive from Windows-based computers.
- Download the latest software image to a location on your computer using this link:
https://avx-prod-files.s3.us-west-2.amazonaws.com/update/nvrosimage/AV.327293.06L.iso - Plug the USB flash drive into the PC you will be using to make the recovery media.
- Download the Rufus application from GitHub:
https://github.com/pbatard/rufus/releases/download/v4.1/rufus-4.1.exe - Run the Rufus executable and click Yes if prompted by Windows to run.
- Click the Select button and browse to the downloaded ProConnect image ISO file (usually located in your Downloads folder).
- The Partition scheme should be set to GPT, and the Target system set to UEFI (non CSM).
- The file system needs to be set to FAT32 in the drop down.
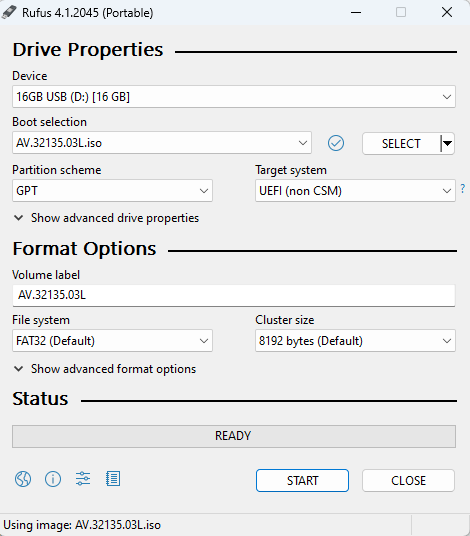
- Compare your Rufus settings to the above image and click Start. Device label and AV.xxxxxxL.iso will vary from the above image based on version of the image.
- You will be prompted with a warning that all data on the USB flash drive will be destroyed, click OK to proceed in creating the recovery media.
- Once complete, close Rufus and remove the USB flash drive from the PC. It is ready to be connected to the NVR.

