How to Fix a "Respawning Too Fast" error on a ProConnect NVR
The "Respawning too fast" error is typically caused by data corruption on the hard drives which prevents the Linux-based ProConnect recorder from booting successfully. Generally, this issue is most typically seen on older/outdated versions of the AvertX ProConnect software.
If this issue is affecting your machine, you will most likely see a DOS-like prompt moving through commands by itself. These messages will typically be followed by messages referencing "xserver", "retry", and "respawning too fast."

Repair Corrupt Data
Use this option to attempt an in-field repair of the corrupt data. * Review all the instructions below as some technical know-how may be required.
Boot into System Recovery Support Tools
- Power the recorder off and wait 10 seconds
- Power on the recorder and tap F12 on the keyboard. This should load the Boot Manager
- Keep the top option selected (this should be the primary OS drive) and hit the "Enter" key, then IMMEDIATELY after hit the "Esc" key
- You should now be at the Grub menu; Hit the down arrow on the keyboard to select the "NVR OS Recovery x64" option and hit enter.
- You should now be at the System Recovery Warning screen; Click "Continue"
- There should now be three options to choose from, "Conditional, Complete & Support Tools"; Select "Support Tools"
- NOTE!!: you will want to be careful at this step as selecting any other option than "Support Tools" will kick off a System Recovery which will bring the unit back to factory settings
- Select "Support Tools" and the recorder should boot into the Recovery environment and display Support Tools.
Once logged into Support Tools
- Double-click Terminal on the desktop. If there is no terminal on the desktop then right-click on the black background and select "Terminals" and "xterm".
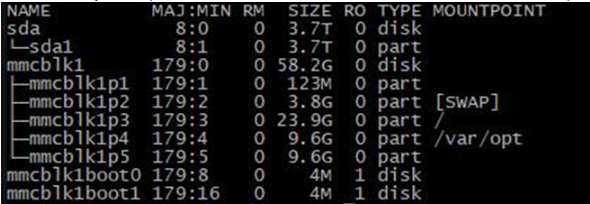
- In the Terminal type lsblk and press enter.
- Take note of the system's partitions. Partition entries are of the formats mmcblk1pN and sdXN where N is a number and X is a lowercase letter. The partitions are marked by an L shaped line indented from the disk name (i.e. sda is the drive itself; sda1 is the partition on the respective drive)
- For each partition in your list run: fsck -y /dev/partition# where "partition#" gets replaced with the partition name.
- Example: fsck -y /dev/sda1
- The recovery partition the system is booted from will refuse to be repaired due to being mounted. Any other errors should be reported to support for analysis. Further diagnostics may be necessary to ensure the drive is not failing.
- If no errors, type: reboot
- Once errors are found and fixed, reboot.
- Recorder should successfully boot into the AvertX software.
Post-repair actions (recommended)
To help prevent this from happening in the future, a patch has been created to allow the NVR to attempt to automatically correct data corruption, if detected.
- Login to the NVR with an Admin account
- Go to the 'Software Upgrade' menu
- Click “Show more Options” and select “Specify URL”
- Copy and paste the following URL: http://software.avertx.com/Support/CheckDisk_0.1.osp
- Click install.
- Once the install is complete, reboot the NVR from the Setup > Power Options menu
- After the NVR boots back up, you will want to get your NVR updated to the latest version of the AvertX software. This will keep the issue from reappearing
NOTE: If the above method does not resolve the issue, the more aggressive option is to run the Factory Default from a Recovery USB to wipe all data from the drives.

