What to check when cameras are not connecting or streaming?
When installing cameras to a ProConnect recorder, there may be occasions when a camera is not actively streaming video or the recorder cannot find or synchronize with the camera(s). In many cases, this is due to two categories of issues that should be checked -- network issues and physical issues:
Physical Issues (Most common - check this first)
- POE Ports
- Always ensure cameras cables are firmly connected and plugged into a POE port to ensure the camera is getting power and communicating/exchanging data packets.
- Go to the NVRs Setup > Networking > Power over Ethernet menu tab to see if the port the camera is plugged into recognizes the camera, is getting power or transferring packets.
- RJ45 Connectors
- An RJ45 connector must be well crimped to ensure the cable strands inside the ethernet cable have solid contact with the camera's dongle pins.
- Depending on how a cable is installed, gravity or the weight of a cable can pull and separate connections if not supported.
- Keep the inside of the camera's dongle clean, and free of oxidation or corrosion.
- IP66 Connectors
- These connectors need to be installed correctly to ensure they are properly sealed.
- They should also be occasionally inspected, especially when a camera(s) is installed outside or in an environment where there's high humidity, heat, or weather fluctuations.
- Cables
- Troubleshoot by putting the camera on a different cable that is new or known to be working. Often times, shorter pre-made patch cables work best for testing or factory defaulting a camera.
- Troubleshoot by putting the camera on a different cable that is new or known to be working. Often times, shorter pre-made patch cables work best for testing or factory defaulting a camera.
- Camera compatibility
- Ensure the camera is ONVIF-conforming.
- Some third-party cameras need to have some proprietary settings configured, like ONVIF support or selecting between h.264 or h.265 video coding standards (AvertX NVRs only support h.264) before they can be added to the recorder.
- Troubleshoot this by following the 3rd party manufacturer’s instructions regarding enabling ONVIF or selecting the h.264 video coding.
- Component fault
- Dead-on-arrival cases for newer cameras are extremely rare.
- Incorrectly installed cameras, or cameras that have been in use for a long time or exposed to the elements for an extended period may need to reset or have their firmware reinstalled.
- After trying a reset, it may also help to see if a different camera works in the same location.
Network Issues
- Camera on a different IP or subnet
- For the recorder to effectively communicate with a camera, the camera needs to be on the same network subnet as the one being used by the recorder's camera adapter.
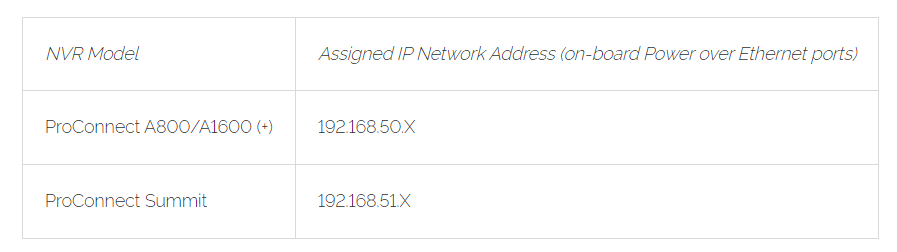
- For the ProConnect Summit recorder, the onboard POE board & (external) camera adapter are set to 192.168.51.1 by default and you will not be able to adjust this IP network assignment.
- For the ProConnect A1600 series recorder, the cameras attached to the main camera ports are configured to use the 192.168.50.x network. If configuring a camera to the NVR's External Cameras port to use an external POE switch, the default IP address is 192.168.51.1.
- Refer to this article to help set up a camera on an external POE switch.
- For the recorder to effectively communicate with a camera, the camera needs to be on the same network subnet as the one being used by the recorder's camera adapter.
- Multiple Cameras in IP Conflict
- By default, most AvertX cameras use 192.168.51.2 as a default IP until they receive a DHCP address from the NVR or the network POE switch they are plugged into. Refer to the respective camera's user manual or this article for additional camera default settings.
- Adding multiple AvertX cameras to a POE switch without DHCP setting up an unique IP address for each camera can result in an IP conflict.
- Troubleshoot by adding one camera at a time, factory default/reset the camera to use DHCP, or manually assign a static IP address that is not already being used by a different camera or device on the network.

