How to Use Network Diagnostics on a ProConnect NVR
ProConnect network video recorders (NVR) can function as stand-alone units, but provide more features and user flexibility when connected to the AvertX Connect cloud service.
ProConnect network access can be diagnosed to confirm connectivity, like when the network works fine for most internet tasks, but the NVR isn't accessible via AvertX Connect.
To view Network Diagnostic details
- Log into the ProConnect NVR's user interface (UI)
- Go to Setup > System Settings > Networking > Diagnostics tab
- When properly connected to the network GREEN check marks are visible under the Status, Ports, and Relay sections:
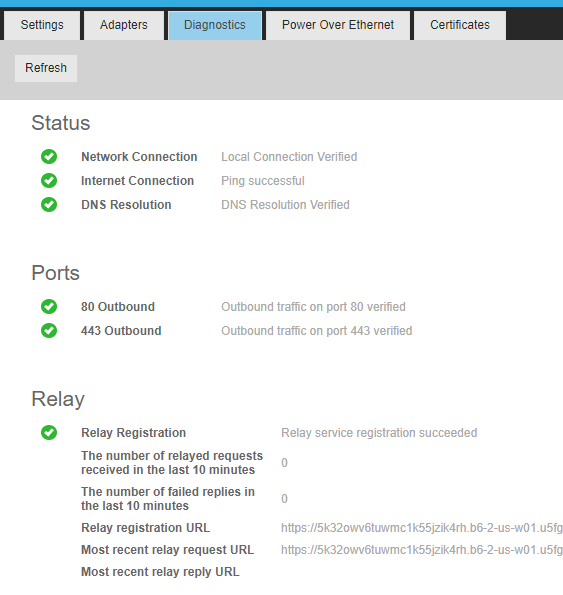
- Status addresses the following:
Network Connection (This pings the gateway setup on the recorder)
Can fail if internal ICMP is disabled on the gateway/router. There are cases where this can fail, but network is functioning.
Internet Connection (This attempts to ping 8.8.8.8 – Google DNS server)
Can fail if behind a firewall that does not allow ICMP traffic to 8.8.8.8. In this case, AvertX Connect may still work if proper whitelisting has been done.
DNS Resolution
DNS resolution is required for many aspects of the AvertX Connect connection. This should NOT be in a failed state at any time. - Ports addresses the following:
80 Outbound (HTTP connection to port 80 of 'cloudApiUrl' branded host: Default is restapi.gp4f.com.)
URL may change due to branding within AvertX Connect
* A GREEN check mark is required for communication
443 Outbound (HTTPS connection to port 443 of 'cloudApiUrl' branded host: Default is restapi.gp4f.com.)
URL may change due to branding within AvertX Connect. - Relay addresses the following:
Relay registration
Relay registration is required for many aspects of the AvertX Connect connection. For AvertX Connect access, this should NOT be in a failed state at any time. - Progress through the following items to help convert a Red X to a GREEN check mark:
a. Check the physical connection (ie cables, connectors, power, etc...)
b. Confirm the network cable connector is firmly plugged into the the Internet or Client port on the back of the NVR.
c. Verify that the NVR has a valid local IP address on the network it's connected to by going to Setup > System Settings > Networking > Adapters >
d. Confirm network devices (ie. switch, router, etc..) have all cables firmly connected and show the NVR is attached.
e. Perform a power drain cycle to refresh the NVR's networking hardware components.
f. Check that network devices like router/firewall don't have "ping" (ICMP) traffic blocked or disabled.
g. Check that the network is using a reliable DNS address, like 8.8.8.8 (Google DNS).
h. Verify there are no firewall or web-filters between the recorder and the internet that would block port 80 and 443 traffic.
i. Visit the AvertX Connect network requirements document for a complete list of URLs which must be added to a network's firewall/web-filter approved-list to allow network traffic. - Click on the Setup > Networking > Diagnostics > Refresh button after connections and settings are changed or confirmed.

