How to Fix Smearing on Cameras
Smearing video is caused by data loss in the form of dropped or misaligned network packets. Adjusting the camera's resources, like bit rate or the number and size of each picture frame, could help with reducing or eliminating smear, depending on the camera. In some cameras, enabling the variable bit rate (VBR) feature in the camera's administrative user interface (UI) can help dynamically reduce or adjust quality based on the connection strength and frame changes.
Types of smearing:
- Network connection between the camera and the recorder.
- Issue shows on recorded video.
- Network connection between the recorder and the web browser or app user interface.
- Issue does not show on the recorded video at the console.
- Recorder resource exhaustion.
- Issue can happen with recorded or not depending on severity.
Cause and Resolution for Smearing Video
- Outdated camera firmware
- Resolution:
- Confirm and upgrade the camera's firmware to the most current.
- Resolution:
- Network/Throughput Issues (Most Common)
- Diagnosis:
- This can occur if there is more data going across the network than what the network can handle causing dropped frames or data loss.
- A PING test will not provide enough data to determine if a network bottleneck is happening. We recommend you use a network diagnostic tool that may help look for dropped or misaligned packets (Black/Red).
- Ensure that links between switches and recorder are negotiating at gigabit speeds and that there are no 10/100 bottlenecks on the network.
- Reduce switch load by temporarily disabling or unplugging half of the connected cameras can help to determine if this may be the cause. If smearing stops occurring with only a few cameras connected this could be the issue.
- Resolution:
- Reduce data size
- Lower bitrate
- Lower video resolution
- Update camera firmware
- Reduce framerate
- Ensure GOP is set to double the framerate (ex. 15FPS/30GOP)
- Confirm network connectivity is sufficient
- Verify ethernet cable is good
- Ensure the recorder is capable of handling total camera throughput (see recorder spec sheet)
- Diagnosis:
- Camera Overloaded (Common for older cameras)
- Diagnosis:
- Consult the cameras spec sheet, manual or manufacturer to ensure the camera is capable of providing the number of streams at the resolution, frame rate and bitrate you have configured
- Try disabling all but 1 stream and set that stream to a lower resolution/frame rate. If this fixes the smearing this may be the issue.
- Resolution:
- If you have multiple recorders connecting to the same camera, try disabling or turning off needless connections.
- Ensure your camera is on the latest firmware
- Reduce data size
- Lower bitrate
- Lower video resolution
- Reduce framerate
- Ensure GOP is set to double the framerate (ex. 15FPS/30GOP)
- Diagnosis:
- Decoding issues
- Diagnosis:
- You may be having a decoding issue if video does not smear when viewing the camera from other computers/devices.
- Check to ensure your computer or devices graphics card drivers are up to date, update any software (web browser, VMS client) being used to view video if possible.
- Check to make sure your hardware meets minimum requirements for viewing the cameras and try lowering the stream you are viewing.
- Resolution:
- Reduce resources or upgrade hardware to ensure enough resources are available.
- Diagnosis:
Example of camera "smearing":
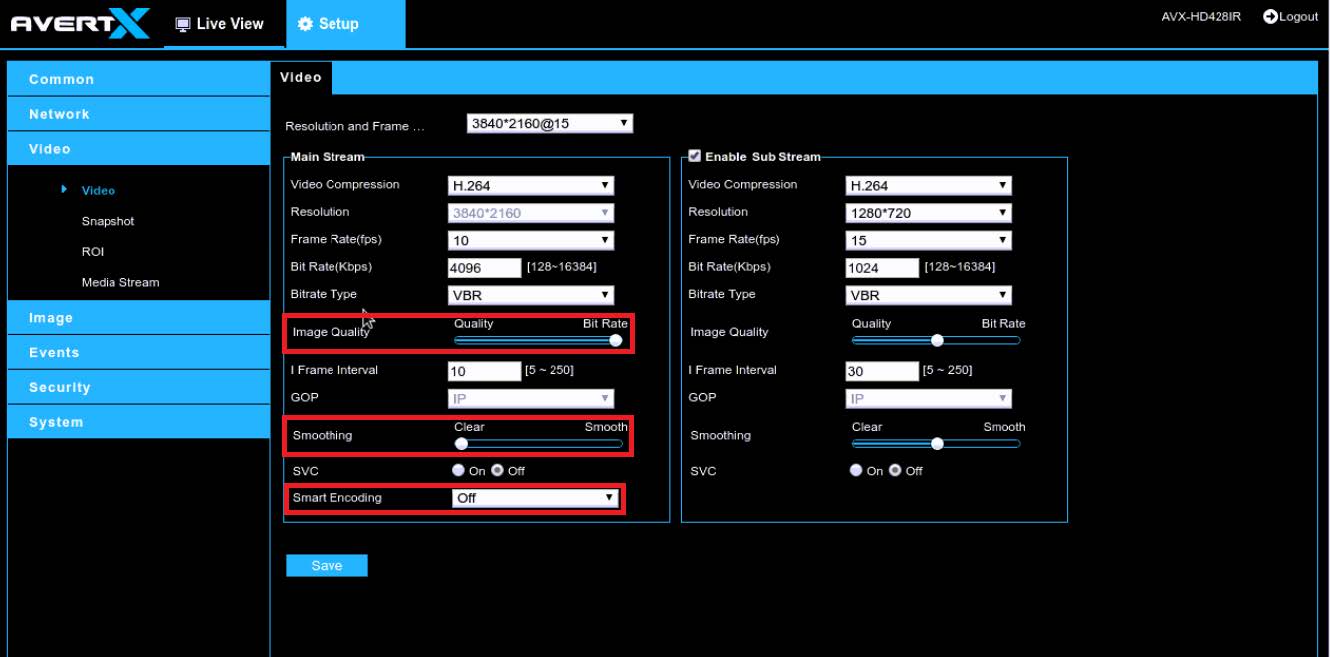
Example steps to fix:
- Log into camera's administrative UI
- Turn smart encoding off
- Move image quality slide bar towards "bitrate"
- Move smoothing slide bar over to "clear"