How do I Replace Hard Drives in a ProConnect NVR?
Replacement of internal components is recommended through AvertX Tech Support and the return of merchandise authorization (RMA) process. Safety precautions must be taken when considering replacement of internal components like hard drives.
Out-of-warranty and in-warranty storage upgrades incur additional labor and parts costs.
Use this link for factory-installed ProConnect Summit NVRs storage upgrades. For RMA estimates on non-ProConnect Summit AvertX NVR models, contact AvertX Tech Support.
With technical know-how, and taking responsibility for altering factory-installed internal components, the following DIY precautions and additional or unique local safety requirements must be applied at all times:
Caution:
- Do not replace your ProConnect HDD without prior consultation with AvertX Technical Support.
- Swapping or adding third-party equipment is a product alteration not covered by the product warranty and may limit support.
- Not properly shutting down the recorder through the software could cause data corruption.
- Electrostatic discharge damage or faulty installations are not covered by the warranty.
- Anti-static and electroshock safety precautions (i.e. properly grounded, anti-electrostatic wristbands, etc...) must be continually observed.
Steps to replace HDDs:
- Ensure you are familiar with replacing hard drives and can safely perform the steps below. If you are not sure, it is recommended that you contact someone locally who has expertise or hire a local computer repair person.
- Contact AvertX Tech Support to review options, as needed.
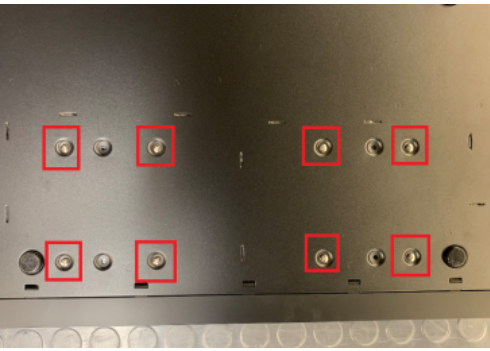
- Remove the 3 screws on both the left and right side.
- Remove the 2 screws on the back of the recorder.
- Remove the lid by sliding it towards the back of the unit.
- Identify which HDD is failing.
- Unplug both the power cable and SATA cable (The SATA cables have a retention clip that needs to be pressed down while unplugging.)
- Unscrew the 4 screws that are holding the drive

Pro Tip: In a properly grounded setting, carefully set the recorder face down and hold the back of the recorder between you and your arm. This allows you to brace the HDD with one hand and unscrew with your other hand.
- Carefully line up the new HDD with the mounting hole. Avoid pinching the cables below in blue. The USB cable and ribbon cable needs to go between the HDDs. This is shown in Brown.
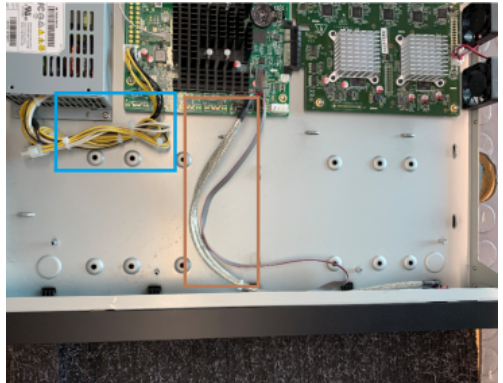
WARNING: pinching these cables will void the product warranty, and may cause a short.
- Replace the HDD screws that you removed in step 7.
- Replace your lid carefully to insure you don't pinch any cables.
- Replace the 2 screws on the back and the 3 both the left and right side.
- Use this FAQ to factory default the ProConnect NVR.

