Adding Legacy Cameras to ProConnect NVRs
AvertX legacy cameras are those developed for recorders produced before the ProConnect network video recorder (NVR), which is compatible with all AvertX cameras.
The ProConnect automatically assigns its own IP addresses to cameras connected directly to it as long as they're configured to use the Dynamic Host Configuration Protocol (DHCP).
At times, a camera may have an IP address that isn't recognizable by the recorder and won't show up in the ProConnect NVR's Network Camera Manager utility tool. Sometimes a camera may require a hardware factory default / reset before being added to a ProConnect NVR.
Some AvertX camera(s) may need additional setting adjustments to properly connect and stream video on a ProConnect NVR.
To add a legacy camera:
1. Log directly into the ProConnect NVR console's user interface (UI), not via a computer web-browser.
2. Connect the camera
directly to the power-over-ethernet (PoE) ports on the back of the ProConnect recorder with a properly functioning network cable.
3. Confirm the camera
powers On: Green/amber lights should flash on the connected port.
4. Go to Setup > System Settings > Networking > Power over Ethernet tab > confirm the table shows the port the camera(s) is plugged into is drawing power.
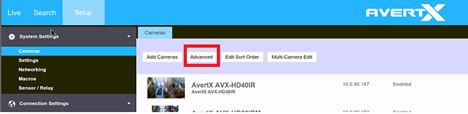
5. Go to Setup > System Settings > Cameras > Click the Advanced button (located next to the Add Cameras button) to access the Network Camera Manager utility tool:
6. The Network Camera Manager utility tool will start in a new window and automatically begin scanning for IP cameras.
7. Click on the box labeled "ONVIF Detection" and then click the "Refresh" button if needed to find connected cameras.
8. Select the check box to the left of the camera(s) chosen for re-configuration:
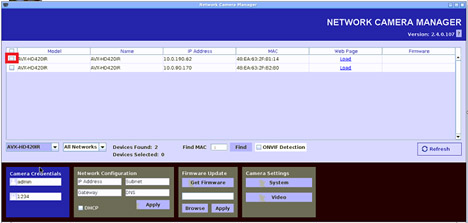
9. In the Network Configuration section of the Network Camera Manager click the DHCP check box next at the bottom, click Apply.
10. Accept/acknowledge the prompts that'll appear to proceed.
11. After
waiting about one minute press the
Refresh button.
12. Confirm the camera(s) have a new IP address assigned from the NVR:
| NVR Model | Assigned IP Network Address (on-board Power over Ethernet ports) |
| ProConnect A800/A1600 (+) | 192.168.50.X |
| ProConnect Summit | 192.168.51.X |
13. Close the Network Camera
Manager to return to the NVR's System Settings > Setup > Cameras > camera list.
14. After 2-5 minutes cameras should begin populating. Recycling the menu page by clicking on a different menu tab and coming back can help refresh the Cameras List page.
Troubleshooting Tips
If Camera(s) Does Not Appear In Network Camera Manager:
In most cases, after confirming the network cable attaching the camera to the NVR is working correctly, performing a hardware factory default / reset should alleviate this problem.
If a 3rd party camera, you should be able to find the reset procedure in the user manual for your particular camera. The user manual for Avertx cameras and NVRs can be found at the Support > Documents and Downloads page.
AvertX cameras have a factory default IP address of either 192.168.0.250 or 192.168.51.2, depending on the model. After you have successfully defaulted the camera, repeat steps 4-13 above to set the camera to DHCP.
If the Camera Is Added But It's
Still Not Working:
In some cases a camera's firmware may be too out of date for the ProConnect recorder's software. To update the camera's firmware you will need to log directly into the camera's administrative user interface (UI) settings:
1. Go to Setup > System Settings > Cameras >
2. Click on the respective camera(s) and check the Firmware Version under the General > Camera Information section.

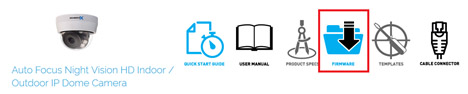
3. Compare the version to those found for the camera model at the Support > Documents and Downloads page:
4. Updates are made directly in the camera's administrative user interface (UI), which may differ between camera models.
5. Copy or write down the camera's unique username and password before clicking on the underlined IP address in blue text to access the camera's administrative UI.
6. Navigate to the camera's Maintenance or Software Upgrade section
7. Update according to the camera's firmware update instructions on the Support > Documents and Downloads page

