How to troubleshoot a camera reporting "Unable to Record"
If a camera connected to a ProConnect NVR isn't displaying video, or is reporting "unable to record" or "unable connect to the device", follow these initial troubleshooting steps:
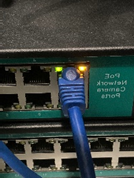
1. Diagnose the connection by checking that the camera is physically plugged into the NVR and drawing power.
On the back of an NVR, every ethernet port on the embedded network switch has a green and an amber light. These lights are known as link lights. When a camera's cable is plugged in, the green light will be solid when there is power, and the amber light will flash, meaning there is data transfer.
2. From the ProConnect NVR's Setup>Networking>Power Over Ethernet menu tab, check if the camera is pulling power and exchanging data Packets per Second (pps) with the NVR

3. If either the Power Draw (Current) or Packets per Second columns are showing a numerical value, verify that the password for the camera is correct in the NVRs record.
AvertX cameras require a username and password to log into the camera and stream video. The username and password residing on the camera must match what the NVR has registered for the username and password.
To check if a camera's password is correct:
- Log into your NVR.
- Go to the Setup>Cameras menu.
- Select the camera.
- Click the eye icon next to the password box to reveal the password.
- Take note of the username and password.
- Click the IP address of the camera in the upper right side and click on the link to log in with the username and password.
- If the page loads to the camera user interface (UI) but is giving you an incorrect username or password, try the default camera password the NVR.
- The default camera password is found in the bottom right of Setup>System Settings>Settings>General Settings tab.
- If the default camera password logs you into the camera, please make sure that the password in the camera's record matches.
- If the default camera password does not log you into the camera, the camera may need to be defaulted.
- See the camera's User Manual for instructions to do a hardware reset/factory default of the camera. Click here for our downloads page.
4. If either the Power Draw (Current) or Packets per Second columns are showing "0.0 pps" for a numerical value, then the physical connection may need to be investigated further.
Follow these steps to help investigate the physical connection:
- Check the plastic RJ-45 connector to ensure that it's not loose and there's no corrosion on the ends. If so, replace it.
- Move the cable for the camera to a different port on the recorder, preferably a port that has a separate, working camera.
- Try using a different cable that is functioning. Alternatively, one could dismount the camera and use a shorter (preferably factory-made) patch cable.
- If the camera starts working on the shorter cable, the cable run for camera may be faulty and should be re-wired.
- If the camera still doesn’t work on a shorter cable, then it's possible the camera may be inoperable.
Contact the technical support team for assistance if after following these steps a camera is still not unable to record or display video.

