How to Enable Remote Tech Support Screen Sharing via BOMGAR on an Apple Macintosh computer
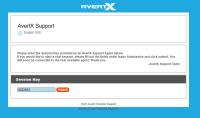
1. In a web browser, go to assist.avertx.com.
2. The Support representative will provide a session key. Enter the code and click Submit:
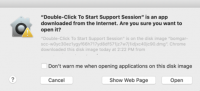
3. The browser will now prompt you to install the local Bomgar applet. This program is what connects us to you. For security, the remote support client will uninstall itself when the session is ended.
4. Run the file that was just downloaded. Click Open when prompted.
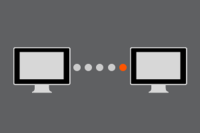
5. An image of two computers with dots moving back and forth will appear. This means the support session is attempting to connect. Connecting it may take up to a few minutes, depending on network speeds.
6. Once the connection is established, the Remote Support Client
will open a chat window. Here you will be notified when the Support
Representative has connected to the session as seen in the image below.

7. Apple has built security measures into macOS that will require adjusting some settings. The following steps will guide you through
these adjustments, and allow he Bomgar software to run without
issue. Please follow along carefully to avoid complications or configuration errors.
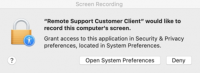
8. Upon connection, the remote client will
request permission to transmit your screen's view so that we can see what you
see (but only during this remote session). Select "Open System
Preferences".
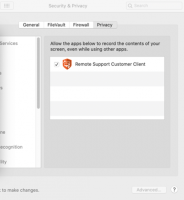
9. System Preferences will launch as pictured below. Click the checkbox next to "Remote Support Customer Client" to enable.
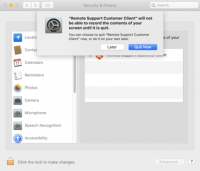
10. The System Preferences application will show the dialogue window pictured below. Click "Quit Now". The system will automatically quit the newly enabled Bomgar software, re-launch, and reconnect the active session.
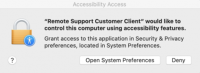
11. The next permission that Bomgar will request is for "Accessibility" control, as pictured below. Click "Open System Preferences" when you see this dialogue window.
12. When System Preferences opens as seen below, please click the
padlock icon at the bottom left, and then enter your Mac user account password
to authenticate when asked.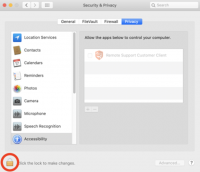
13. Once you have made changes as directed above, click the checkbox
next to "Remote Support Customer Client" to enable access, as shown
below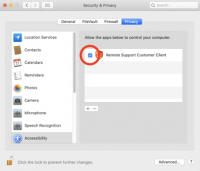
14. If you see this window appear, enter your Apple user account
password, and click OK.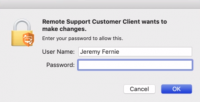
15. The Support agent will now be able to assist on your Mac as if they were at your side.
If at any time you wish to disconnect, closing out of the chat window will end the session and immediately disconnect the support agent from the computer.

