How do I trigger a camera to start recording & trigger an event and email notification when a sensor is activated?
This guide explains how to set up your recorder to record when sensors are activated.
To trigger a camera to start recording during an event where a sensor is activated, you will first need to make sure you have your sensor properly attached to the recorder. To do this, you will need to go into the setup menu and chose the "Sensor / Relay" option on the side menu. From here, you will be able to access and adjust the sensors that are connected to the back of the recorder, as well as any applicable cameras that have sensor capabilities that are attached to the recorder. Make sure that the sensor you wish to use to trigger an event is properly connected and set to the correct default state. You can also associate a camera with a specific sensor on this page if you have a specific camera for that sensor in mind.

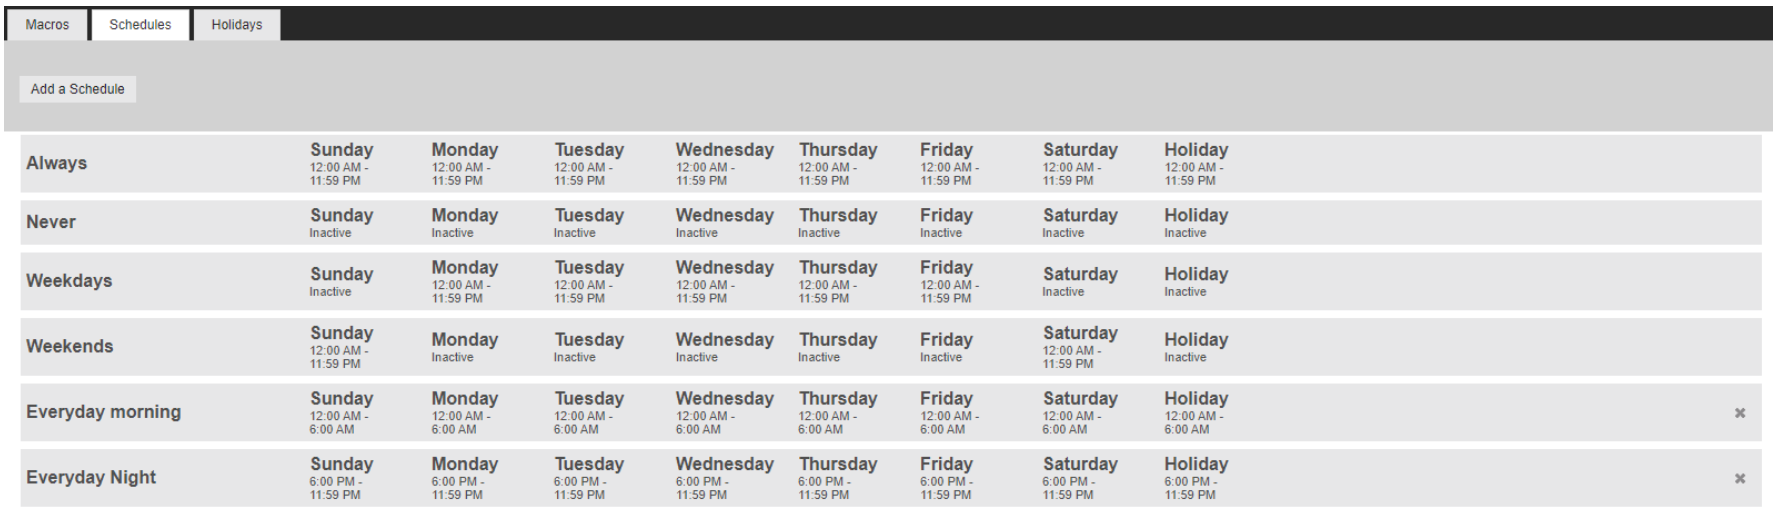
- Go to "Macros" option under the Setup Menu
- Select the "Schedules" tab at the top of the page
- Create a custom schedule if you require one
- IMPORTANT: Each time on each day is for that specific day of the week. If you need to have a recording go past midnight you will need to create 2 schedules, one with the active time before midnight and one with the active time after midnight
- Select the "Macros" tab at the top of the page
- Click "Add a Macro"
- Name the Macro
- Under "When any of the following happens"
- Select Schedule
- Select "Sensor" as event class
- Select Event Type
- Select Source
- Select which sensor will cause the trigger the macro
- To allow any of your sensors to trigger the macro, choose all

Under "Take this action"
- Select Schedule
- Select Type
- Recording - allows you to select a camera to start recording when sensor is activated
- Target Object - The camera you want to start recording when the sensor is activated
- Use Event Camera - use the camera you associated with the sensor
- Command - What action you want the recorder to take
- Duration - How long you want the recording to last when the sensor is triggered
- Target Object - The camera you want to start recording when the sensor is activated
- Relay - sends signal to attached relay
- Target Object - The relay you wish to trigger when the sensor is activated
- Command - What action you want the recorder to take
- Duration - How long you want the relay to be activated while the sensor is triggered
- Recording - allows you to select a camera to start recording when sensor is activated

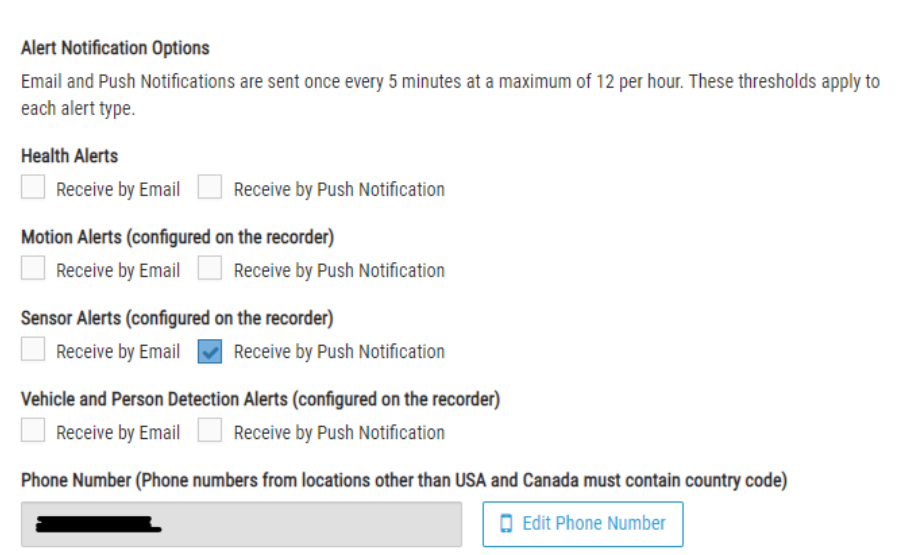
To get email alerts or notifications when a macro occurs, you must first have your recorder connected to AvertX Connect. If your recorder is connected, you will want to go into your recorder settings to the "AvertX Connect" option on the side menu. Once there, you will want to make sure that you have "Send all Event Data to AvertX Connect" checked. This will allow the recorder to send event information to your Connect account. You may also wish to check the box for "Send Event Images to AvertX Connect" as this will allow you to preview snapshots of the event when you receive an email or notification. Once these are enabled, you will want to log into connect.avertx.com and click on "Manage Users" from the menu bar across the top of the screen. You will then select your account, or the account of whomever you want to receive alerts. Once the account has been selected, scroll down to the section that says "Sensor Alerts (configured on the recorder)" and check "Receive by Email" to get alerts sent to the email associated with this account, or "Receive by Push Notification" to get alert notifications sent to any mobile app this account is signed into. Once you have selected how you want to get your notifications, click on save in the lower right hand corner.