How Do I Change Display Settings on a ProConnect NVR
The ProConnect NVR’s Linux OS is designed to recognize and configure itself for use on various display brands. There are times, however, when the system is unable to recognize or synchronize with a display monitor or TV. When this happens you may need to adjust the NVR's Display Settings.
Before configuring the NVRs software settings, consider doing the following first:
- Turn off the NVR at the server console through the Setup menu (Setup>Power Options>Power Off)
- Ensure the display monitor or TV is properly connected to the NVRs HDMI port
- Turn on the display monitor or TV
- Ensure the monitor or TV has the correct source or display out port selected (ie. HDMI1 or HDMI2, etc...)
- Power up the NVR
If the monitor or TV still doesn't display correctly do the following:
- Be physically on site at the headend of the NVR console, with a monitor/keyboard/mouse physically attached to the unit.
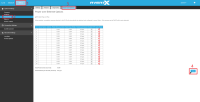
- Make sure you've logged in as Admin or an account with Administrative privileges. The below image shows a numbered guide of the clicks require to access Support Tools:
- Click ”Setup” at the top of the page
- Select “Networking” from the lefthand side menu
- Click over the “Power Over Ethernet” tab
- Select “Tools” on the far right of the window
3.This should launch you into the Linux desktop, you should now see a home screen with some icons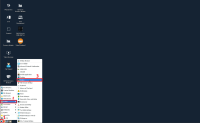
4. To get to the display setting, hover your cursor down at the far bottom left of the screen to bring up the little toolbar
- Select the Avertx logo at the far left of the toolbar.
- Select “Settings” from this menu
- Select “Display” from the next menu. The "aRandR" menu is also a display settings application, as it has similar options but some different ones as well. It can sometimes be helpful for troubleshooting
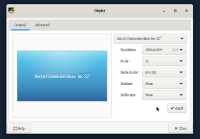
5. You should now see the following, and should now be able to change the display settings: