FAQs
Use our FAQ section to quickly find an answer to your question. If you can not find an answer in the FAQs or the product manual, contact our support department.
Recorders
ProConnect
How to view exported video files from AvertX NVR recorders?
Viewing exported video on AvertX NVR platforms varies according to the respective recorder platform/operating system.
AVI and MP4 files are a commercial format for digital video files and are compressed to reduce storage size. DRV files are a proprietary format similar to RAW which is less compressed (ie larger files/better quality) than AVI.
On the P2A and P2B series operating system video files are exported as AVI or DRV/System. There is no conversion method between these formats after they’ve been exported.
DRV videos can be played through the respective NVR’s Backup Viewer. The Backup Viewer is separate computer program that can emulate an actual NVR. DRV files can be viewed with the NVR’s Backup Viewer downloaded directly from the NVR remote web viewer interface. The remote web viewer interface can be accessed via the local IP address though a compatible web browser.
The Performance Series NVR (firmware 1196c and above) has the ability to export/convert an AVI file from a DRV file when played back through its respective Backup Viewer.
The new ProConnect NVR is the only NVR which can export video directly in MP4 format. Exporting in a raw or less compressed video format is not available on the ProConnect NVR. MP4 files are described as having a better quality in the same size as AVI and there are multiple media player options for MP4 video.
How fast of an Internet Connection do I need for remote viewing?
AvertX recommends an NVR site upload bandwidth speed of 5 Mbps for an optimal experience when remotely viewing video over the WAN (Internet). This will result in a positive user experience when reviewing video from one 4MP high definition or up to 9 standard definition streams. In instances where less than 5 Mbps is available remote users should plan to utilize standard definition streams for retrieving video over the WAN.
While the AvertX Connect platform is highly configurable to meet exact bandwidth usage requirements the following table may be referenced as a typical use case:
Average bandwidth usage based on D1/4MP, 6,000Kbps, 15 IPS, 15 GOP IP Cameras |
||
|
Channel Count |
Live & Search SD Playback |
Live & Search HD playback |
|
Single channel |
500 Kbps |
5 Mbps |
|
4 channel grid |
2 Mbps |
Not Applicable |
|
9 channel grid |
5 Mbps |
Not Applicable |
|
16 channel grid |
8 Mbps |
Not Applicable |
Note: The AvertX Connect platform dynamically chooses HD or SD streams for viewing based on the client display configuration selected by the user. Example: A 4CH view will deliver SD video by default while a single channel view will automatically deliver the HD stream. Stream selection may also be manually controlled using the stream selection control at the top of the applicable display screen.
What is the difference between the AvertX Go! and AvertX Connect Mobile Apps?
AvertX Go! mobile apps work with P2A, P2B, Performance and Pro Series NVRs. AvertX Connect Mobile Apps work with only ProConnect NVRs.
How do I add an ONVIF camera to the ProConnect NVR
- Plug the camera(s) into one of the ProConnect NVR's PoE camera ports on the back of the unit.
- Download the network camera finder software. If the camera is an AvertX HD30, HD40, HD300, HD310, HD80 Series, HD90 Series or HD810 camera, download the Device Search Camera Finder to a Windows-based computer
- Plug an RJ45 cable from the computer’s network interface to an empty PoE camera port on the back of the ProConnect NVR. The computer should be configured to automatically obtain an IP address via DHCP.
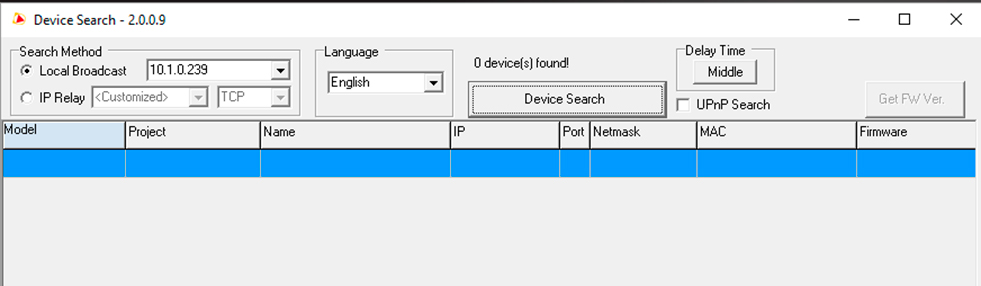
- For an AvertX camera, find and run the AvertX_Device_Search.exe, When loaded, press the Device Search button.
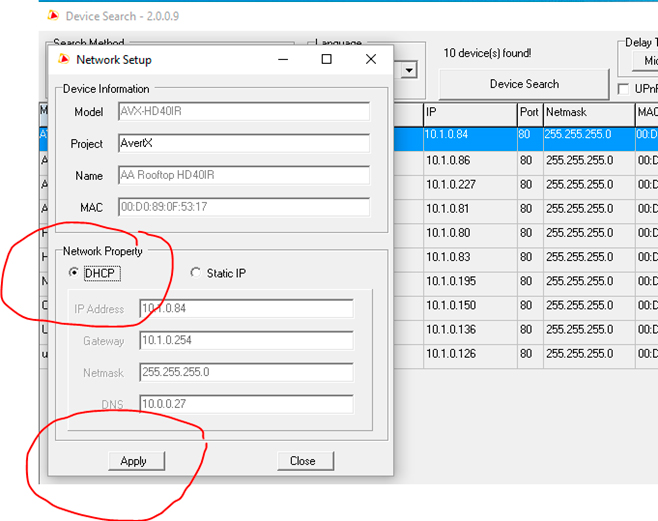
- When the search is completed, highlight a camera, right click on the mouse for the pop-upmenu. NOTE: Multiple cameras can be selected simultaneously by pressing and holding the Control button on the keyboard and the right button on the click on the mouse as each camera is highlighted.

- Select the ‘Network Setup’ option
- Click on the ‘DHCP’ radio dial and click on ‘Apply’
- After a few minutes, the camera should obtain an IP address from the ProConnect NVR.
- If the camera doesn’t automatically show up and begin streaming video images on the NVR after a 5 minute period, return to the ‘Network Setup’ menu of the Device Search Camera Finder to verify that the camera’s IP is on the 192.168.50.x network.
- If the camera has obtained a ProConnect IP address on the 192.168.50.x network, restart the ProConnect NVR by going to Setup> Power Options>Restart… press Yes to confirm.
- If after 5-10 minutes of rebooting the NVR the camera still doesn’t show up, contact the AvertX Support team.
How do I upload and view video to AVX connect?
- Login to the NVR through a web browser (Chrome, Safari, Firefox, Edge, etc) via an account on http://connect.avertx.com
- Click on the Search tab at the top left side of the screen
- Using the search options at the bottom of the screen (showing the date and time) select the starting time to be save be saved.
- Press the Save icon in the lower right hand corner of the screen
- Select length, quality, and resolution of the video to be saved
- Press “Save to AvertX Connect”. To view the upload progress, click on the cloud at the top right-hand side of the menu, located on the right side of the account name.
- To view uploaded videos:
- Click on the arrow pointing upward at the top right-hand side of the menu, located on the left side the account name.
- Click on the Videos icon on the left hand side of the connect.avertx.com page
How to determine the IP address of cameras connected to a ProConnect NVR
- From the NVR main display screen click on Setup in the top left-hand corner
- The Cameras menu is the first menu option beneath System Settings at the middle-top right-hand side of the Setup menu.
- The IP address is listed beside each attached camera.
How to determine the MAC address of cameras connected to a ProConnect NVR
- Use the FAQ, How to determine the IP address of cameras connected to a ProConnect NVR
- Click on Setup>Networking (on the right hand side of the menu)>Plug and Play
- Find the IP address identified from step 1 above to determine its MAC address
How to configure external switch for manual configuration
Note: Please use this FAQ to configure the HD320, HD420, HD820, and HD920 cameras through an EXT-switch. For ONVIF and other AvertX cameras, please use the FAQ titled, How do I add an ONVIF camera to the ProConnect NVR. It’s highly recommended to have a Windows-based computer and at least 3 Cat-5 network cables.
- Please plug the first network cable into the EXT-Switch port on the back of the NVR (directly below the Internet port)
- Plug the other end of the previously mentioned cable into the PoE switch.
- Physically at the NVR, click on the Setup icon the on the top left hand corner of the main screen
- Click on the Networking menu on the right hand side of the screen
- Click on the Adapters tab
- Select the EXT-switch in the menu
- Change from DHCP to Static IP.
- Set the IP as: 192.168.51.2
- Set the netmask as: 255.255.255.0
- Set the Gateway as: 192.168.51.1
- Set DNS1 as: 8.8.8.8
- Set DNS2 as: 8.8.4.4
- Click Apply and Save. Please wait if there is a delay while the NVR system is configuring the port.
- From the Computer, plug a network line from the computer into an empty port on the NVRs embedded switch (camera port). Suggest using camera port 16, if available.
- Configure a manual IP address onto the network card
- Windows: Go to the Control Panel.
- Click on networking.
- Select change adapter settings on the left side.
- Right click on the network adapter select properties.
- Click on the Internet protocol version 4 and click on properties.
- Click on Use the following IP address:
- IP: 192.168.50.3
- Subnet: 255.255.255.0
- Gateway: 192.168.50.1
- DNS 1: 8.8.8.8
- DNS 2: 8.8.4.4
- Please remember to return to the section when finished in order to re-enable DHCP on the computer network card.
- Plug cameras into the camera switch built into the NVR
- Use the FAQ, How to determine the IP address of cameras connected to a ProConnect NVR, to locate the IP address of the cameras that are going on the EXT-switch
- Open the web browser of choice (Chrome, Firefox, Edge, or IE)
- Connect to the IP address of the camera from step 11
- Username: admin
- Password: 1234
- Click on the Setup on the top left
- Under Common on the top left hand side of the screen, click on the TCP/IP menu item
- Under IPv4
- DHCP/Static IP select static IP on the drop down
- Set the IP address on the camera to:
- IPv4 Address: 192.168.51.100 (suggest using 100 up to 120)
- Subnet: 255.255.255.0
- Gateway: 192.168.51.1
- Unplug the camera and plug it into the PoE Switch.
- Return to Step 9 of this FAQ and complete steps A though E to change the camera to obtain an IP address automatically. Click on Apply. In a few minutes, the camera should be visible in the Cameras menu on the NVR
How to configure external switch for with router-supplied DHCP
Note: Please use this FAQ to configure the HD320, HD420, HD820, and HD920 cameras through an EXT-switch. For ONVIF and other AvertX cameras, please use the FAQ titled, How do I add an ONVIF camera to the ProConnect NVR.
You will need administrative access to a network router that has DHCP enabled, a separate PoE switch, and at least 3 Cat-5 network cables.
- Power on the NVR, Router, & PoE switch
- Plug a network cable into the EXT switch port on the back of the NVR unit; plug the other end of the same cable into the router
- Plug a network cable into the router, plug the other end into the PoE switch
- Plug a camera into the PoE switch
- The camera should automatically get an IP address from the Router
- In a few minutes, the camera should be visible in the Cameras menu of the NVR
How do I activate a dormant or inactive auto-focus function on an HD820 or HD920 Autofocus camera?
To activate a dormant auto-focus, please do the following:
- Remotely connect to the ProConnect NVR via a web browser
- Go to Setup > Cameras > select the camera that is out of focus > confirm the box to enable the “PTZ/Autofocus” function is checked, and exit the camera setup
- Go to Live > move the mouse cursor to the top of the display of the camera that is out of focus until a blue banner appears. Click on the “+” button a few times and then the “-“ button to activate the camera’s zoom and auto-focus function.
P2A/P2B and Performance/Pro Series
How do I connect my HDIP Recorder to my TV?
You can use either the HDMI port located on the back of the Recorder, or you can use the VGA display port if your TV supports this.

Supported Resolutions:
1024x768, 1280x1024, 720P, 1080P
How do I switch between Basic and Advanced mode?
Note: This is For the P2A/P2B models only
There are two menu modes, most advanced user setup options are only available in Advanced mode. Once you switch, Advanced mode will persist until you switch back to Basic mode.
To switch from Basic to Advanced mode in the recorder setup menu:
- Click System and set Basic/Advanced Setup Mode to Advanced.
How do I access my network information?
For any remote access, you will need to know the basic network information for your recorder. Follow these steps to detemine the IP address, Subnet mask, and Default Gateway (which is the router address) of your recorder.
- P2A/P2B Model
1. On the Menu screen, click Network.
2. Click LAN Setup. Confirm that DHCP is set to On.
3. Set Network Restart to On.
4. The following information will appear:
- IP Address*
- Netmask
- Gateway
- DNS
5. Close LAN Setup.
6. Right-click to return to the Main menu.
7. Right-click again to return to the Live screen.
- PS Model
1. On the Menu bar, click Setup.
2. Click System Setup.
3. Click Network Setup.
4. Click General Settings tab. Confirm that DHCP is set to On.
5. Set Network Restart to On.
6. The following information will appear:
- IP Address*
- Netmask
- Gateway
- DNS
7. Close Setup to return to the Live screen.
* NOTE: If the IP address is showing as 169.254.x.x this is what is called an APIPA configuration and is invalid and will not show on your network.
Please ensure the cable is plugged into the router/modem and is firmly seated. Then repeat steps 1 through 7 for your model of recorder.
If the Network Restart continues to give you an APIPA configuration, Please, contact AvertX Customer support or call our Pro Team at 855.228.3789.
How do I set up Port Forwarding on my HDIP Recorder?
The IP address of your recorder is identifiable within your network. In order to be able to access your recorder from a remote location through the internet, you will need to configure your router to forward the information from the internet to your recorder. The default port for your recorder is 80. In order to forward information to this port, follow these instructions.
Configure Your Router
These directions are generic. If you are not familiar with this process, you should consult the user manual of your router. Other references that might be useful are the manufacturer website, support line, or a website such as PortForward.com.
- For P2A/P2B Model
Configure Your Recorder
1. On the Menu screen, click System
2. Set your recorder to Advanced Setup Mode.
3. Click Network.
4. Click Web Port.
5. Verify that the port designated on your recorder is the same as the port you have chosen on your router. The default port is 80.
6. To change the web port, click Num and type your desired port number. This must be the same as the port configured on your router for remote access to function.
7. Click OK.
8. Right-click to return to the Main menu.
9. Right-click again to return to the Live screen.
- For PS Model
Configure Your Recorder
1. On the Menu bar, click Setup.
2. Click System Setup.
3. Click Network Setup.
4. Click General Settings tab.
5. Look for Web Port.
6. Verify that the port designated on your recorder is the same as the port you have chosen on your router. The default port is 80.
7. To change the web port, click the Keyboard icon and type your desired port number. This must be the same as the port configured on your router for remote access to function.
8. Click OK.
9. Close Setup to return to the Live screen.
How do I set up DDNS?
To access your recorder from outside your local network, the recorder needs a static IP address. Most internet providers do not supply this, but AvertX provides you with a free service to solve this problem. Detailed instructions for setting up your free DDNS service can be found on the Dynamic Domain Naming System (DDNS) Installation and Activation insert included in your HDIP packaging.
- P2A/P2B Model
1. On the Menu screen, click Network.
2. Click DDNS Setup.
3. Set Enable DDNS to On.
4. Type the Host Name, DDNS Account, and DDNS Password information to your recorder into the appropriate fields.
- Note: This information is case sensitive.
5. Select Send/Update and click Yes. This is automatically set itself back to Off when the process is complete.
6. Once the update is complete, the Host Name field will automatically populate the full host name.
7. Right-click to return to the Main menu.
8. Right-click again to return to the Live screen.
- PS Model
1. On the Menu bar, click Setup.
2. Click System Setup.
3. Click Network Setup.
4. Click DDNS Setup tab.
5. Set Enable DDNS to On.
6. Type the Host Name, DDNS Account, and DDNS Password information to your recorder into the appropriate fields.
- Note: This information is case sensitive.
7. Set Send/Update to On. This is automatically set itself back to Off when the process is complete.
8. Once the update is complete, the Host Name field will automatically populate the full host name.
9. Close Setup to return to the Live screen.
How do I access my HDIP recorder on my computer using the Web Viewer?
The AvertX Remote software requires the ActiveX control. ActiveX is only supported on the Internet Explorer browser.
Mac OS support: AvertX offers an app to view video on a Macintosh computer called AvertX Remote available in the Mac App store.
Internet Explorer
The AvertX recorder allows access to video using Internet Explorer versions 6 and above.
1. Open Microsoft Internet Explorer.
2. Type the IP address of the recorder into the Address bar.
3. If you are using the Web Viewer for the first time, you will be asked to accept the installation of ActiveX. Click Yes.
4. Type the User ID and Password of an authorized user.
5. Click Connect to display your cameras.
Installing ActiveX
To Install ActiveX, you will need a Windows XP or newer operating system and Internet Explorer version 6 or above.
1. Click Start > Control Panel > Network and Internet > Internet Options.
2. Click Security.
3. Click Custom Level.
4. Ensure that all ActiveX settings are set to Enable or Prompt.
5. Click OK.
6. Click Trusted Sites.
7. Click Sites.
8. Verify that the check box next to Require Server Verification is cleared.
9. Type the IP address of your recorder in Add This Website to the Zone.
10. Click Add.
11. Click Close.
12. Click OK.
I have Internet Explorer, why can't I open my Remote Web Viewer?
The AvertX Remote software requires the ActiveX control. ActiveX is not supported on the Windows 8 mobile phone or the Surface RT and Surface 2 tablets running Microsoft Windows RT.
Desktop Mode
If your computer has Windows 8, 8.1, or 10, you must be in Desktop Mode when you open Internet Explorer.
Internet Explorer 11
Internet Explorer 11 (released October 17, 2013 bundled with Windows 8, 8.1, and 10) contained compatibility errors with the AvertX Remote web viewer on older versions of AvertX HDIP firmware. If you have IE11 installed, you may see an error message when you attempt to connect to your AvertX recorder. To view your recorder, you need to update your recorder firmware or use the IE10 Compatibility Mode. To view your recorder in Compatibility Mode:
1. Click the gear icon on the top menu bar of Internet Explorer, and then click Compatibility View settings.
2. Type the IP address, or DDNS address, of your AvertX recorder and then click Add to add your recorder to the Compatibility View list.
3. Click Close and then click the Refresh button on the browser.
How do I access my HDIP recorder using mobile applications?
Once you have set up your recorder for remote access, you can use your smart phone or tablet to access your recorder with AvertX GO! for iPhones and Android devices, or AvertX GO! HD for the iPad or Android tablet.
1. When connection from within your local network, use the IP address of the recorder.
2. When connecting from outside your local network, use the DDNS address.
Downloading an App
To install AvertX GO! on your device, you will need to have a valid account with either the Google Play Store (for Android devices) or App Store (for Apple devices).
1. On your device, tap either App Store or Play Store icon.
2. Tap Search and type AvertX GO!
3. Follow the instructions to download and install the application.
4. When the app is successfully installed, the AvertX icon will appear on the device.
5. Click the AvertX icon to open the app.
Connecting to Your Recorder
1. Tap + or Add to add a new device.
2. Tap Add Site Manually
3. Type the appropriate information into the required fields. Name, IP, Port, User, and Password fields.
- The default port is 80.
- The default User is admin.
- The default password is 1234.
Connecting to Your Recorder Using AvertX Connect
1. Tap + or Add to add a new device.
2. Tap Add AvertX Connect Account.
3. If your account already exists, enter the appropriate login information, and then tap Connect or Save and tap the account from the list and tap Connect.
--OR—
4. Tap New Account to create an AvertX Connect account.
5. Enter First and Last name, email address, password and confirmation, and the caption verification.
6. Agree to the Terms of Use, and then tap Create Account.
7. You will receive an email from AvertX Connect, tap the link in the email to Activate your account.
8. Follow steps 1-3 to add your new account and connect to your recorder.
How do I set up email alerts on my HDIP recorder?
Configuring your recorder to send e-mail alerts will allow you to notify up to three recipients when an alarm event occurs. Due to the potentially high volume of these e-mails, AvertX recommends using a dedicated e-mail address specifically for alert notices.
- P2A/P2B Model
1. On the Menu screen, click System.
2. Set your recorder to Advanced Setup Mode.
3. Click Network.
4. Click E-Mail Management.
5. Select which email account you are configuring in E-Mail Select (1, 2, or 3).
6. Click E-Mail Activate and select Off.
7. Type the E-Mail Address you want to receive alert messages.
8. To include a video file with the alert messages, click E-Mail Video Attachment and select On.
9. Click Event/Alarm Selection.
10. Choose what kinds of alarm events to be notified about by clicking them and selecting Yes or No.
11. Close Event Alarm Selection.
12. Click SMTP Server Setup.
13. Set Email Via SMTP to On.
14. Type your desired SMTP Server, SMTP Port, SMTP Account, and SMTP Password into the appropriate fields.
15. Set Use SSL Connection to On or Off as desired.
16. Close SMTP Server Setup.
17. Set E-Mail Activate to On.
18. Repeat for up to two more e-mail recipients.
19. Close E-Mail Management.
- PS Model
1. On the Menu bar, click Setup.
2. Click Alarms Setup.
3. Click E-Mail Management.
4. Click General Settings tab.
5. Select which email account you are configuring in E-Mail Select (1, 2, or 3).
6. Click E-Mail Activate and select Off.
7. Type the E-Mail Address you want to receive alert messages.
8. To include a video file with the alert messages, click E-Mail Video Attachment and select On.
9. Click Event/Alarm Selection tab.
10. Choose what kinds of alarm events per channel (per channel only available on Performance Series) to be notified about by clicking them and adding or removing the check in the box.
11. Click General Settings tab.
12. Set Email Via SMTP to On.
13. Type your desired SMTP Server, SMTP Port, SMTP Account, and SMTP Password into the appropriate fields.
14. Set Use SSL Connection to On or Off as desired.
15. Set E-Mail Activate to On.
16. Repeat for up to two more e-mail recipients.
17. Close Setup to return to Live view.
How do I set the date and time on my HDIP recorder?
It is recommended to configure your Date and Time before your HDIP system is operating and recording video, but it is not required. Follow these instructions to set the date and time on your recorder. For easy navigation, you can connect a mouse to a USB port on the recorder. For further instructions regarding date and time, setup details, and configuration, see the user manual.
NOTE: You can only change the date and time on your recorder when at the actual recorder. You cannot make changes to the date and time remotely through an internet browser.
NOTE: When changing any date and time setting a warning message will appear that states "Data mismatch will occur resulting in lost information. Please format all Hard Drives when complete." Pressing Yes on the message will save the changed setting, pressing No will cancel the change. What the message means is if you already have recorded video and you set the date or time back days/hours, it will cause the recorder to begin recording from the new date/time and will overwrite any preexisting data when it comes back around to the original date/time. Formatting the hard drive is not required, but is recommended so data is synced with the correct date/time.
- P2A/P2B Model
1. On the Menu screen, click System.
2. Click Date/Time.
3. Click Date and select the appropriate date on the calendar.
4. Select Time and use the up and down arrow buttons to set the correct hour and minute.
5. Putting the curser on AM/PM and using the up and down arrow buttons will change this setting.
6. Select Time Zone and use the arrow buttons to select your appropriate time zone. In the United States:
- Eastern Time Zone: -5:00
- Central Time Zone: -6:00
- Mountain Time Zone: -7:00
- Pacific Time Zone: -8:00
7. Select Date Display Mode to change display of the Date in the Live and Search views, Y = Year; M = Month; D = Day.
8. Select Time Display Mode to change display of the Time in the Live and Search views, 12 hour or 24 hour.
9. Set Daylight Saving Time to On or Off to enable this setting if required for your time zone.
10. Close Date/Time.
11. Right-click to return to the Main Menu.
12. Right-click again to return to the Live screen.
- PS Model
1. On the Menu bar, click Setup.
2. Click System Setup.
3. Click Date/Time.
4. Click Date and select the appropriate date on the calendar.
5. Select Time and use the up and down arrow buttons to set the correct hour and minute.
6. Putting the curser on AM/PM and using the up and down arrow buttons will change this setting.
7. Select Time Zone and use the arrow buttons to select your appropriate time zone. In the United States, the Eastern Time Zone is -5:00, the Central Time Zone is -6:00, the Mountain Time Zone is -7:00, and the Pacific Time Zone is -8:00.
8. Select Date Display Mode to change display of the Date in the Live and Search views, Y = Year; M = Month; D = Day.
9. Select Time Display Mode to change display of the Time in the Live and Search views, 12 hour or 24 hour.
10. Set Daylight Saving Time to On or Off to enable this setting if required for your time zone.
11. Close Setup to return to Live view.
How do I password protect my HDIP recorder?
The recorder does not require authentication by default. To password protect the recorder, please follow the instructions below.
NOTE: Once Password Protection is enabled, you will need to use the administrative account and password to disable this setting. The default account is User: admin; Password: 1234. It is recommended that you change the password in Account Setup.
- P2A/P2B Model
1. On the Menu screen, click System.
2. Set your recorder to Advanced Setup Mode.
3. Click Users.
4. Set Password Protection to On.
- PS Model
1. On the Menu bar, click Setup.
2. Click Management.
3. Click Maintenance.
4. Set Password Protection to On.
How do I set up multiple user accounts on my HDIP recorder?
- P2A/P2B Model
1. On the Menu screen, click Users.
2. Click Account Setup.
3. Click the Account drop-down menu and select the desired account, then click Edit to change the account name (all accounts except admin can be edited).
4. Click Edit next to the Password and Confirm fields to edit the selected user account password.
5. Click the drop-down menu for Privilege and select the desired level for the selected user account. Each user account can be assigned different privileges that limit their usage of the recorder.
6. Once all changes are made click Save to save the changes made, or click Cancel to discard changes.
7. Repeat steps 3-6 for additional account changes.
- PS Model
1. On the Menu bar, click Setup.
2. Click Management.
3. Click Account Setup.
4. Click the Account drop-down menu and select the desired account, then click Mod to change the account name (all accounts except admin can be edited).
5. Click into the Password and Confirm Password fields to edit the selected user account password.
6. Click the drop-down menu for Privilege and select the desired level for the selected user account. Each user account can be assigned different privileges that limit their usage of the recorder.
7. Once all changes are made click Confirm to save the changes made, or click Close to discard changes.
8. Repeat steps 4-7 for additional account changes.
How do I control my HDIP recorder with a keyboard and mouse?
Keyboard and mouse for the P2A/P2B Model only. PS Model can only be controlled with mouse.
How do I update the firmware on my HDIP recorder?
- P2A/P2B Model
Performing a firmware update is not always necessary if you are not currently experiencing any issues. Contact AvertX Customer support or call at 855.228.3789 prior to updating to confirm if an update is required for your recorder.
1. Download the firmware file to a computer and then unzip, or extract, the files.
2. Copy the folders (upd_900g2s, upd_900s, upd_tseries) to the root of a USB thumb drive.
NOTE: The firmware file contains firmware for several HDIP models. Your recorder will select the appropriate version to install.
- upd_900s
- NV160-P2A & NV80-P2A
- NV80-P2B
- upd_900g2s
- NV160-P2B
- upd_tseries
- NV40-P2B
3. Insert your USB thumb drive into any of the USB ports on your HDIP recorder.
4. On the Menu screen, click Information.
5. Click Software Upgrade.
6. A message will appear, instructing you to shut down and unplug the HDIP recorder. Shut down and unplug the recorder, then plug it back in and restart it. This ensures all recorded data is securely written to the recorder before proceeding with the update.
NOTE: Ignore this message when it appears after you have restarted the recorder.
7. Turn your HDIP recorder on and repeat steps 4-5.
8. Click Upgrade to start the upgrade process.
9. Your HDIP recorder will restart itself during the upgrade process, after the restart the update will be completed.
- PS Model
Performing a firmware update is not always necessary if you are not currently experiencing any issues. To remotely via a PS model NVR via AvertX Connect, it needs the latest firmware. Contact AvertX Customer support or call at 855.228.3789 prior to updating to confirm if you're note sure an update is required for your recorder.
1. Download the firmware file to a computer and then unzip, or extract, the files.
2. Copy the folders (upd_snseries) to the root of a USB thumb drive.
NOTE: The firmware file contains firmware for several HDIP models. Your recorder will select the appropriate version to install.
3. Insert your USB thumb drive into any of the USB ports on your HDIP recorder.
4. On the Menu screen, click Setup.
5. Click Management.
6. Click Software Upgrade.
7. A message will appear, instructing you to shut down and unplug the HDIP recorder. Shut down and unplug the recorder, then plug it back in and restart it. This ensures all recorded data is securely written to the recorder before proceeding with the update.
NOTE: Ignore this message when it appears after you have restarted the recorder.
8. Turn your HDIP recorder on and repeat steps 4-6.
9. Click the checkbox next to the Upgrade Version to start the upgrade process.
10. Your HDIP recorder will restart itself during the upgrade process, after the restart the update will be completed.
How Do I Set My Remote Control to Control a Different NVR?
To assign a unique Unit ID on the recorder:
- Right-click the Live screen and click Menu.
- Click System.
- Select Basic/Advanced Setup Mode and click Advanced.
- Click Remote Control ID.
- Select an ID number (1~10).
To set the number on the Remote Controller:
Press DVR SELECT on the remote controller and enter the corresponding Remote Control ID number at the same time to operate the recorder.
______________________________________________________________________________________
NVR firmware versions prior to v10858 require different instructions to set the Remote Controller ID.
To assign a unique Unit ID on the recorder:
- Right-click on the Live screen and click Menu.
- Click System.
- Select Basic/Advanced Setup Mode and click Advanced.
- Click RS485 Setup.
- Select Unit ID and click Num.
- Use the on-screen keyboard or a USB keyboard to assign an ID to your recorder.
- Click OK.
To set the number on the Remote Controller:
Press DVR SELECT on the remote controller and enter the corresponding Remote Control number to operate the recorder. For example, if the Unit ID is set to 225, press DVR SELECT on the remote controller and then press 2 immediately.
| Unit ID | Remote Controller ID |
| 224 | 01 |
| 225 | 02 |
| 226 | 03 |
| 227 | 04 |
| 228 | 05 |
| 229 | 06 |
| 230 | 07 |
| 231 | 08 |
| 232 | 09 |
| 233 | 10 |
| 234 | 11 |
| 235 | 12 |
| 236 | 13 |
| 237 | 14 |
| 238 | 15 |
| 239 | 16 |
What is the difference between the P2A and P2B NVR models?
The primary advantages of the P2B model are size (9.625” vs. 17. 75” depth) and power. The P2B model NVR has a dual processor for improved video performance and the ability to support 3MP cameras. The P2A model NVR is limited to 2MP (1080p) camera support. This table shows the specifications of both models (16CH) side by side.
How do I export and backup video from my NVR?
There are 2 options:
- Local export (with USB hard drive attached to recorder)
- This is the fastest option
- Attach an external USB drive up to 2TB formatted as FAT32 to any of the NVRs USB ports.
- Limited to 8GB size export per export
- Requires multiple exports if over 8GB is needed
- Remote export (through web viewer on Windows PC)
- This option could be slower depending on variables like the network speed, size of export, etc.
- Not limited to any size other than the workstation hard drive you are saving to
- Will break up all exported files into 700MB files
What is the difference between the P2A and P2B NVR models?
The P2B model is the current version of the AvertX NVR. The primary advantages of the P2B model are size (9.625” vs. 17. 75” depth) and power. The P2B model NVR has a dual processor for improved video performance and the ability to support 3MP cameras. The P2A model NVR is limited to 2MP (1080p) camera support. This table shows the specifications of both models (16CH) side by side.
Will Remote Web Viewing work with Windows 10?
Windows 10 introduces a new default browser called Microsoft Edge. This browser does not support ActiveX. Microsoft continues to install Internet Explorer 11 with Windows 10 and also has a way to switch to Internet Explorer from Edge when necessary.
Accessing Internet Explorer if you are already using Edge:
- When you first connect to the recorder it will show the following page informing you that Internet Explorer is required.

- Click the Menu button and click "Open with Internet Explorer".

- A new Internet Explorer window will open to the same page explaining Internet Explorer is required.
- Retype your IP/Domain name and it will start the install process for ActiveX and open the web viewer.

Open Internet Explorer directly:
- Click Start > All Programs > Windows Accessories > Internet Explorer; or click Start and type "Internet Explorer"
Open Internet Explorer directly (as Administrator to export files when UAC is enabled):
- Click Start > All Programs > Windows Accessories > Internet Explorer; or click Start and type "Internet Explorer"
- Right click and click "Run as administrator"

How do I upgrade the hard drive (HDD) storage on a Performance Series NVR?
- Shutdown the NVR from the unit’s menu. Setup > Configuration Management > Shut Down > Power off.
- Unplug the NVR unit from the power source.
- On a static-free surface, remove the top cover of the NVR (6 screws total: 2 on top, 2 on either side). After the top cover is removed the hard drive (HDD) tray is visible.
- If there are more than 2x hard drives in the unit, disconnect the SATA cable from the HDD that is being upgraded > then unplug the power cable to the HDD.
- Remove the large Philips-head screw, then slide the hard drive towards the back of the unit to release it from the assembly/hard drive tray.
- Turn the HD tray over and remove the 4 screws from the assembly.
- Reverse order of the steps 5 & 6 to install the new HDD drive
- The HDD will be auto-detected by the HDD when the NVR is powered back on. The new HDD is then formatted and starts recording immediately after the format is complete.
Please note: You may need to purchase Hard drive mounting screws with for this installation, as the hard drives usually do not come with them.
How do I configure a ProConnect cameras (HD320, HD420, HD820) to Performance Series NVRs (without a separate external PoE switch)?
Note: this does not apply to HD920 Bullet Camera.
- Plug camera into Performance Series (PS) NVR
- Remove dome cover (for HD320 and HD820) to press the reset button; HD420 has the reset button on the back. HD920 doesn’t have a factory reset button.
- IMPORTANT! Within the first 10 minutes of plugging the camera in, locate the Reset button, press and hold for about 15 seconds.
- Camera will factory restore – DO NOT UNPLUG CAMERA OR POWER CYCLE THE NVR DURING THIS PERIOD. Could take from 2-10 minutes depending on the cable run/environmental factor.
- Insert a spare Cat5 cable into the NVR switch.
- Configure the computer’s IPV4 network interface card to the following IP address: 192.168.0.200 / Subnet Mask 255.255.255.0 / 192.168.0.254. (see steps 9a-9f on FAQ “How to configure external switch for manual configuration”)
- Open up a web browser on the computer that was just configured>in the URL bar, type http://192.168.0.250 (this is the camera’s defaulted IP address). Username admin / password 1234)
- Click ‘Off’ button on the password reset that will pop up once connected to the camera’s admin interface.
- Click on the Setup button
- Under the Security menu field, click on ‘Network Security,’ select the ‘RTSP Authentication’ tab, change the Authentication drop down menu option from Digest to None. Click on Save.

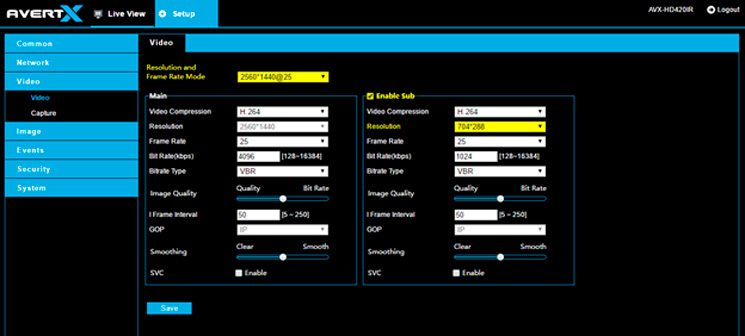
- Under the Video menu field, click on ‘Video’. Two items need to be changed:
- Resolution Frame Rate Mode: change to 2560*1440@25. Click Save.
- Ensure Enable Sub is checked and set the Resolution to: 704*288. Click Save.
- On the upper left side, under the “Common” menu field, find ‘TCP/IP’ and click on it. At the IPV4 section, change DCHP/Static IP to Static IP.
- Configure with the following settings (NOTE: Please follow these steps carefully)
- IMPORTANT: Determine which port the camera is being plugged into. Each port has a different subnet/network. The third octet of the IP address (bolded) is 50 plus the port number. For instance, Port 1 = 192.168.51.x (x is any number from 2-254); Port 2 = 192.168.52.x… Port 10 = 192.168.60.x, etc….
- Subnet mask 255.255.255.0
- IMPORTANT: Gateway is similar to the IP address assigned to each port. Determine which port the camera is being plugged into. Each port has a different gateway. The third octet of the IP address (bolded) is 50 plus the port number. For instance, Port 1 = 192.168.51.1; Port 2 = 192.168.52.1… Port 10 = 192.168.60.1, etc….
- Please double-check settings before pressing Save. If the information is entered incorrectly, you may not be able to connect to the camera unless you factory restore it again.
- From the NVRs local interface, right-click on the screen and the Menu icons appear at the top of the screen. Click Setup.
- Go to the Camera Setup menu item on the left hand side
- Select the port ID you’ve chosen for the camera (ex. CH1, CH2, CH3, etc….)
- On the Connections tab, set ‘Enable PnP’ to Off and ‘Activated’ to Off
- Change Model from AvertX to ONVIF
- In the Hostname/IP field, enter the IP address from step 13a
- Set ‘Activated’ to On (Leave PnP Off)
- Reverse the steps taken to configure the IPV4 network interface card, in step 6.
- The camera should begin streaming and displaying on the NVR screen within 1-5 minutes.
Cameras
How do I update the firmware on my AvertX camera?
- Download the camera firmware file to a computer and then unzip or extract the file.
- Access your camera through a web browser. Type the IP address of your camera in the address bar or see how to Access Cameras Connected to Your HDIP recorder.
- When you have accessed the camera page, click Setup at the top of the page.
- In the setup menu, click the Software upgrade tab on the left side of the page.
- Under Upgrade click Browse to locate the firmware file on your computer
- Select the firmware file (uImage_userland) and click Open.
- Click Upgrade to start the upgrade process.
How do I access my HDIP cameras that are connected to my HDIP recorder?
You can easily access the configuration menu of each camera using Internet Explorer. The camera uses an address based on the IP address of the HDIP recorder starting with port 81. So, if you want to access the camera that is on channel 3 of your HDIP recorder, type http://recorder ip address:83. (Ex: http://10.10.10.100:83). Ensure that you use the http:// prefix when typing the address in the address bar of the browser.
This works with the internal and external IP address of the recorder, as well as the DDNS address.
How do I remove the dome cover on my HD80 camera?
The HD80 dome cover is designed with a watertight seal to protect the camera from water ingress. Use the instructions below to remove the dome cover:
- Use the included Torx wrench to loosen the dome cover screws.
- Insert the Torx wrench into the mounting screw holes in the camera base.
- Use the Torx wrench as a handle to separate the camera base from the dome cover.

How do I focus my AvertX HD90 camera?
For optimal image quality, you will need to manually focus your AvertX camera once it has been installed. Please use the following instructions to focus your AvertX HD90 Night Vision HD Indoor/Outdoor Bullet Camera.
1. Remove the screw at the bottom of the front lens cover.
2. Remote the front lens cover by gently tilting it up from the bottom.

3. Remove the rubber gasket.
4. Loosen the set screw.
5. Turn the lens to focus your cameras.

6. Tighten the set screw.
7. Replace the rubber gasket.
8. Align the positioning pin at the top of the camera lens cover with the hole on the camera body and replace the cover.
9. Replace the screw at the bottom of the lens cover.
How do I focus my AvertX HD30 camera?
For optimal image quality, you will need to manually focus your AvertX camera once it has been installed. Please use the following instructions to focus your AvertX HD30 HD Indoor/Outdoor Micro Dome Camera.
1. Use the included Torx Tool to loosen the two screws on the camera body.
2. Remove the dome housing.

3. Install and position your HD30 Dome camera as desired.

4. Loosen the lens set screw.
5. Turn the lens to focus the camera.

6. Tighten the set screw.
7. Replace the dome cover.
8. Use the Torx Tool to tighten the two screws.
How do I rotate a camera video image using the NVR software?
If your camera is installed on a wall or table top the image may appear to be upside down. Rotate the camera video image using the recorder interface to get a right-side-up image.
Note You cannot rotate the video image 90° to get a vertical image. Rotating the image 90° will stretch and distort the video image.
To rotate the camera video image:
- On the recorder, open the setup menu and click on Cameras.
- Click Device Setup, and then Stream Settings.
- For Video Rotation, select the desired rotation type.
- Normal transmits the image as the camera sees it.
- Flip transmits the image backwards and upside down.
- Mirror transmits a mirror image.
- 180 Degree transmits the image upside down.
Is my HD80IRM Rev B/HD40IR Rev B camera 2MP or 3MP?
All cameras with the model name HD80IRM Rev B & HD40IR Rev B are 3MP resolution video.
What microSD card can I use in my cameras?
How do I enable recording to a microSD card on my cameras?
- Open Microsoft Internet Explorer (IE) web browser.
- If your camera is connected directly to the HDIP recorder: Type the IP address of the recorder, followed by : and then /admin. (example: http://10.1.10.15:83/admin)
- Using the default web port (80), the camera uses an address based on the IP address of the HDIP recorder starting with port 81. Camera 3 will be port 83 and camera 11 would be port 91.
- If using a unique web port, identify the correct web port at Menu > Network > Webport
If your camera is connected to an external PoE switch, type the IP address of the camera in the address bar of the web browser followed by /admin. (example: http://10.1.10.27/admin) - Type the user name and password of the camera in the pop up window.
- The default username is admin and the password is 1234
NOTE: Do not change the username account/password on the camera software

- After logging in, go to System > Storage Management > SD Card

- Ensure the camera is reading the card. Under Device Information, the Free space will have a number corresponding with the size of the card.
- Click Recording, on the left menu bar, and ensure that under Recording Storage the SD Card option is selected.

- Under Recording Schedule, click the Always option.
- Click Save to apply the settings.
How do I reset the camera to factory default? Where is the camera reset button located?
- Ensure the camera is plugged in to the NVR with “plug and play” (PnP) is turned on. Turning PnP on is done for each camera in the Camera Menu.
- Press and hold the reset button for 30 seconds.
- Unplug the camera from the NVR for 15 seconds, and plug the cable back in.
- Allow enough time for the camera and NVR to exchange settings and restore the connection.
*Note: With the HD30 and HD80IRM, use a bent paperclip or similar item to press the button.*

