How do I Configure Person And Vehicle Analytics Detection on an AvertX camera
Accessing Camera Setup Menu
To adjust analytics settings, you will need to access the local camera setup menu.
To connect to camera setup menu:
- With the camera connected to a ProConnect recorder, enter the recorder’s Setup menu.
- In the Cameras tab, click on the camera you would like to adjust.
- Click on the IP Address in the Camera Information column on the right side.
- Enter User Name and Password to log into the camera.
Note: Camera passwords can be found by clicking on the eye icon next to the password field in the recorder camera menu.
Adjusting Person and Vehicle Detection
Step 1: Choose Person or Vehicle Analytic Regions
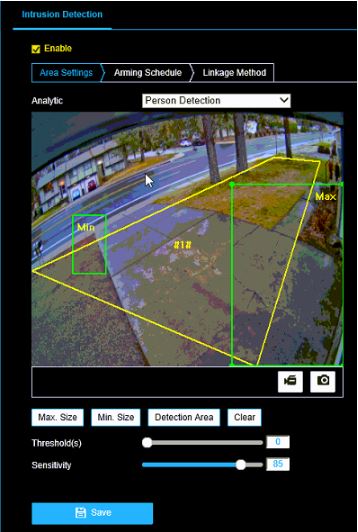
The local camera setup menu will load to the Analytics tab by default. Select Person or Vehicle Detection to adjust detection settings.
Step 2: Set Detection Area
Detection area defines the area in an image where Smart Analytics will be performed. Modifying this area can mask out parts of the scene you do not want to trigger a detection event. To adjust the detection area, click a corner point and drag to the new position.
To create a detection area:
- Click on Detection Area.
- Click on the image to set the first point of the detection area.
- Move to the next point and click to set. Repeat to complete the shape.
Step 3: Set Minimum and Maximum Size
Detection boxes are used to set the minimum and maximum sizes of objects you would like to detect using Smart Analytics in the image. To adjust the Min/Max size, click a corner point and drag to the new position.
Minimum Size
To create a Minimum (Min) Size detection box:
- Click on Min Size.
- Click and drag a box representing a person or vehicle at the furthest distance from the camera to detect.
Maximum Size
To create a Maximum (Max) Size detection box:
- Click on Max Size.
- Click and drag a box representing a person or vehicle at the closest distance from the camera to detect.
Step 4: Set Threshold
[Range 0-10 sec] Threshold is the amount of time, in seconds, a person or vehicle must be detected in the detection area to trigger an event. For example, if threshold is set to 2, an event is triggered when a person or vehicle has been detected for 2 seconds.
TIP: AvertX recommends a threshold of 0-1 for most scenes.
Step 5: Set Sensitivity
Range [1-100] The value of the sensitivity defines how sensitive the system is to objects which can trigger events.
- Setting the sensitivity too high can result in increased false alerts.
- Setting the sensitivity too low can result in missed events.
TIP: AvertX recommends a sensitivity range of 85 to 95 for person and vehicle detection accuracy in most scenes.
Step 6: Click Save