From the Performance Series NVR (PS) NVR, determine the port you wish to use for the camera, go the NVR Setup menu>Camera Setup>select the channel (CH) associated with the chose port. Write down the "Hostname/IP" that is currently associated with the port. Note: This is information is needed on step 14 of this FAQ.
Camera will factory restore – DO NOT UNPLUG CAMERA OR POWER CYCLE THE NVR DURING THIS PERIOD. Could take from 2-10 minutes depending on the cable run/environmental factor.
Insert a spare Cat5 cable from the computer into an open camera port on NVR switch.
Configure the computer’s IPV4 network interface card to the following IP address: 192.168.0.200 / Subnet Mask 255.255.255.0 / 192.168.0.254. (see steps 9a-9f on FAQ “How to configure external switch for manual configuration”). Note: If there is any existing information in these fields that may be unique to your network in these fields, you may choose to write them down to restore it after step 21.
Open up a web browser on the computer that was just configured>in the URL bar, type http://192.168.0.250 (this is the camera’s defaulted IP address). Username admin / password 1234.
Click ‘Off’ button on the password reset that will pop up once connected to the camera’s admin interface.
Click on the Setup button
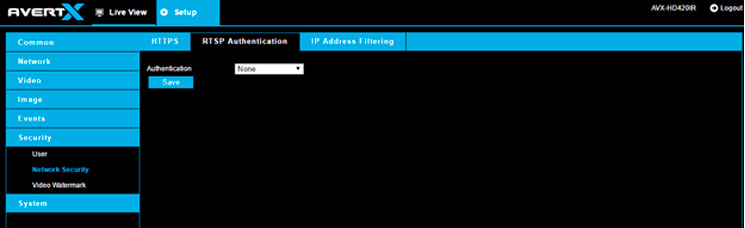
Under the Security menu field, click on ‘Network Security,’ select the ‘RTSP Authentication’ tab, change the Authentication drop down menu option from Digest to None. Click on Save.
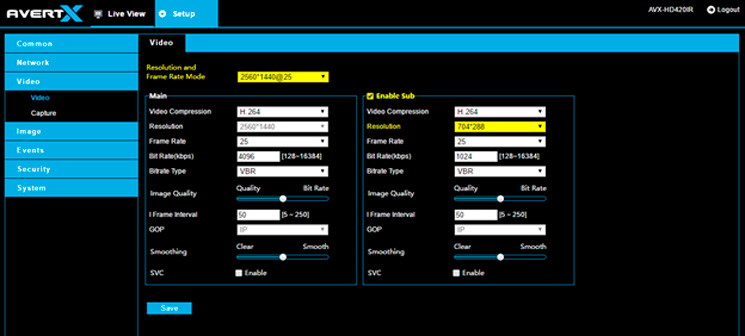
Under the Video menu field, click on ‘Video’. Two items need to be changed:
Resolution Frame Rate Mode: change to 2560*1440@25. Click Save. Note: You may have to click away to another menu option after clicking on Save to refresh the page.
Ensure Enable Sub is checked and set the Resolution to: 704*288. Click Save. Ensure all the settings match the diagram below:
On the upper left side, under the “Common” menu field, find ‘TCP/IP’ and click on it. At the IPV4 section, change DCHP/Static IP to Static IP.
Enter the IP address obtained in step 2. Please note the following:
IMPORTANT: Each PS NVR port has a different subnet/network. The third octet of the IP address (bolded) is 50 plus the port number. For instance, Port 1 = 192.168.51.x (x is any number from 2-254); Port 2 = 192.168.52.x… Port 10 = 192.168.60.x, etc….
Subnet mask 255.255.255.0
IMPORTANT: Gateway is similar to the IP address assigned to each port. Determine which port the camera is being plugged into. Each port has a different gateway. The third octet of the IP address (bolded) is 50 plus the port number. For instance, Port 1 = 192.168.51.1; Port 2 = 192.168.52.1… Port 10 = 192.168.60.1, etc….
Please double-check settings before pressing Save. If the information is entered incorrectly, you may not be able to connect to the camera unless you factory restore it again.
From the NVRs local interface, right-click on the screen and the Menu icons appear at the top of the screen. Click Setup.
Go to the Camera Setup menu item on the left hand side
Select the port ID you’ve chosen for the camera (ex. CH1, CH2, CH3, etc….)
On the Connections tab, set ‘Enable PnP’ to Off and ‘Activated’ to Off
Change Model from AvertX to ONVIF
In the Hostname/IP field, enter the IP address from step 2
Set ‘Activated’ to On (Leave PnP Off)
Reverse the steps taken to configure the IPV4 network interface card, in step 7.
The camera should begin streaming and displaying on the NVR screen within 1-5 minutes.