How do I add an ONVIF camera physically connected to the ProConnect NVR
The ProConnect system will attempt to automatically discover ONVIF cameras. For best results, please ensure that the cameras are set to obtain an IP address automatically, ie DHCP enabled. If the NVR doesn't issue the camera a 192.168.50.x IP address, please do the following:
1. Plug the camera(s) into one of the ProConnect NVR's PoE camera ports on the back of the unit.
2. For an AvertX camera, log in directly to the NVR console unit, then go to Setup>Cameras>Advance to open the “Network_Camera_Manager.”
3. On startup, the Network Camera manager will begin scanning for IP devices.
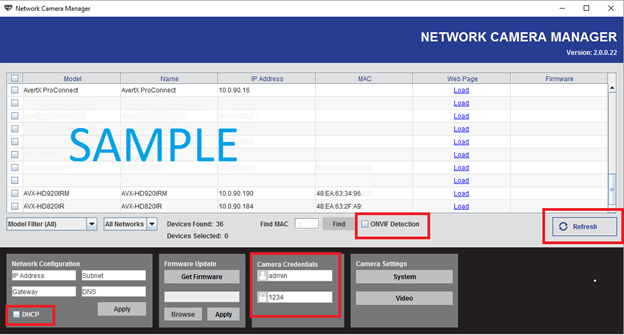
4. When the search is completed, find the camera and check the box on the left of it. If the camera isn’t found on the initial scan, check the “ONVIF Detection” box and click on the “Refresh” box to scan again.
5. Once the camera appears, check the ‘DHCP’ box on the lower left and click on ‘Apply’
6. After a few minutes, the camera should obtain an IP address of 192.168.50.x if attached to the ProConnect’s PoE switch. If it doesn’t, re-click on the “Refresh” box to scan again.
7. If the camera doesn’t automatically show up with an IP address on the 192.168.50.x network and begin streaming video images on the NVR after a 5 minute period, re-start the ProConnect by going to Setup> Power Options>Restart… press Yes to confirm.
8. If the camera has obtained a ProConnect IP address on the 192.168.50.x network, and after 5-10 minutes of rebooting the NVR the camera still doesn’t show up, contact the AvertX Support team.
Alternate method:
a. Obtain a laptop or computer with an RJ45 port.
b. Download the network camera finder software. If the camera is an AvertX camera, download the Network Camera Manager to a Windows-based computer. If a third party camera, download and install the manufacturer's camera management utility/app.
c. Plug an RJ45 cable from the computer’s network interface to an empty PoE camera port on the back of the ProConnect NVR. The computer should be configured to automatically obtain an IP address via DHCP.
d. For an AvertX camera, find and run the downloaded “Network_Camera_Manager_v2.6.0.3.exe” file to install the Network Camera Manager program.
e. Scan for cameras and continue from step #3 as indicated above.

